Showing posts with label extras. Show all posts

Born Pretty - Marquise Studs & Beaded Chain

Another couple of items provided by Born Pretty to review. 
First up are these marquise shaped gold studs. They can be found here for $5.83.
I didn't have any trouble with them. They lie flat and adhered with just wet topcoat. My only preference would have been if they were smaller. They are quite large which limits what all designs you can do. I have another idea in mind that I will try and post at a later date.
For this look, I used KleanColor Cobalt to paint a french tip, then I placed the studs with a dot of topcoat. After that I painted the gold accent swirls with Essie Good as Gold. Then I topcoated the entire look.


The second item is this beaded chain that can be found here for $5.61. It's 100cm in length and that'll allow for a lot of different uses.
In this look, I was trying to line up the beaded chain along the half moon. You can see it didn't really work. :( The chain is too stiff to bend much. I used cuticle nippers to trim off the length I wanted to use, and it cut easily.
 

You can see the edges stick up even under topcoat.... I'm just not loving this beaded chain. I need to find another way to use them perhaps.


More aboutBorn Pretty - Marquise Studs & Beaded Chain

Pressed Flowers

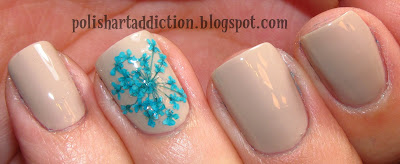
Today I have some dried flowers from Born Pretty that can be incorporated into nail art. Take a look at what I managed to come up with.

I painted my nails with 2 coats of Essie Sand Tropez. Then I applied topcoat. While the topcoat was still wet I used tweezers to pick up the flower and lightly place it on my nail. Then I used the slanted end of the tweezers to gently poke down all of the places that were sticking up. If my topcoat dried too fast, I just dabbed a little more under the flower where I needed it. Once the flower was stuck down good, I applied 2 thick coats of Seche Vite to really lock it in.


I found these pretty easy to work with. I think they would look even better under clear gel polish. I think that would make them look even more like pressed under glass...

These can be found here at Born Pretty for $6.08. It comes as a pack of 12 which is really a good deal in my opinion. The only problem is that each cannister only hold a few flowers. So you need to plan your design around that. There were only 3 of these teal bundle flowers available.... Some of the smaller single flowers had only 2 or 3 in the cannister. So 10 finger nails and only 3 flowers might make for a random combination. But feel free to mix it up and use multiple colors. 

Don't forget about my 10% off coupon code if you decide to purchase these for yourself.

More aboutPressed Flowers

Strawberry Nail Art

I like the idea for this, but I don't think it's really worth it. The amount of time dedicated to creating vs the amount of time it will last on your nails..... These beads will start popping off before you know it. It's just not terribly practical. But oh so cute!


I started with 2 coats of China Glaze Traffic Jam

Then used a small nail art brush to freehand some OPI Jade is the New Black leaves. I then highlighted the leaves using Essie Navigate Her.

Then a little white highlight using a white nail art striper polish.

Then painstakingly added the bullion beads/microbeads/tiny steel balls. I just applied a little topcoat at a time and stuck them on individually. Once they were all on, I put a layer of topcoat over the whole nail.

Some sweet strawberries to enjoy this summer!


More aboutStrawberry Nail Art

Woven Striping Tape + Tutorial

This is one of those ideas that strikes you first thing in the morning, just out of no where. You think it's a great idea, but probably going to be an epic fail once you try it. This time it worked out for me though! I'm so happy with how it looks and I hope I can explain it in a way you can recreate it for yourself.

Paint your base polish. Here I used 2 coats of China Glaze Dance Baby. Then apply a fast dry topcoat. I used Seche Vite. This steps helps to speed things up and you can move on to applying the tape strips.

Then cut rough lengths of striping tape and start at the cuticle. Apply one color of striping tape horizontally. Apply a 2nd color strip of tape lengthwise. Just lightly press them down.
  
Apply all of the lengthwise pieces and lightly press down. Arrange them so that they alternate going over or under the horizontal piece.
You'll probably find it easier to use tweezers to apply the tape.

Using your tweezers, pull back every other strip just to where the horizontal piece is.

Stick down another piece of the horizontal color. Put it on top of the pieces that are still lying flat, yet make sure it goes under the pieces you previously pulled up.

 Repeat the process going down the length of the nail. 

Then clip off all the little ends that hang off and topcoat.

Here maybe you can see the pattern better because there isn't a glare off of the tape.


What do you think? I wouldn't recommend doing all of your nails this way, that would be awfully time consuming! Maybe stick to an accent nail or two? Enjoy!
More aboutWoven Striping Tape + Tutorial

Stud Nail Art

I received these 4mm silver studs from Born Pretty to review. I immediately knew I wanted to recreate Rebecca's nail art that she did in gold. 
The blue is Sally Hansen Insta Dri Blue Away. The ring finger is OPI Crown Me Already topped with Milani Jewel FX Silver.

You can get these studs here for $5.84. They are SO easy to work with. They come in a resealable plastic bag. I stuck them down on my still-wet topcoat and they are good to go!

I tried to catch this angle of my thumb so you can see that they lie quite flat. The corners don't lift and get snagged. :) I only had a little trouble on my pinky because that nail is the narrowest. Even that nail isn't too bad that it bothers me. Once the studs were placed I put one more layer of topcoat on top.


Then I tried another look with the studs lined up along the nail. This proved tricky because my nails weren't exact matches. For the studs that were hanging off, I clipped them with nail clippers. The aluminum they are made with is very soft and easy to cut. Cutting it like that, pulled it off of my nail, so I put it back down with a drop of nail glue. I figured it would likely catch and snag, needing some extra protection.

The polish here is Essie Tour De Finance.


The studs lasted one entire day before I lost the one closest to the free edge of my pointer finger. A casualty was had for the sake of turning my iPhone to silent mode.... Then I proceeded to pick them all off, just because that's what I tend to do.

Don't forget if you want to place an order on Born Pretty you can use my coupon code for 10% off!
More aboutStud Nail Art

Novelty Nails - Microbeads/Fish Eggs

Next up was microbeads! I wanted to try out the "Caviar" trend. I found this set of microbeads at Michaels for 50% off. It had 8 different colors in the mulitpack for a final price of $3.50. Much cheaper than the Ciate version....

You can attach these a number of ways... foil glue, nail glue, or still wet topcoat. You would probably get the best wear out of nail glue. When I tested these I had them coming off left and right after just 1 hour of wear. I just used still wet Seche Vite though.

 I'm wearing China Glaze Spontaneous btw.
 I prefer this as just an accent nail and not an entire mani. But that's just my opinion. :)

More aboutNovelty Nails - Microbeads/Fish Eggs

Novelty Nails - Fuzzy Sweater

I've seen a lot of these strange 3d textured nail art ideas springing up on blogs lately. From granulated sugar for a rock candy look, to the "caviar" look inspired by Ciate's costly product. The idea of putting flocking powder on your nails has been done on several blogs already. The Polishaholic and Let Them Have Polish are the ones I have seen. So when I was in Michael's and saw the flocking powder required to make this look was on clearance for 99 cents, I picked it up!

At first I thought it would be entirely impractical because how could you even wash your hands? 
Can it get wet? I did some testing (I'll show you) and I actually liked this a lot more than I thought I would! And it's so soft, you want to sit there and just "pet" your nails and stroke them lightly.... lol


Here is how I did it in case you are interested:
2 coats of China Glaze Laced Up. It's best to find a base color that's as close to the color of the flocking powder as possible. That way tiny gaps are less noticeable. Top with Seche Vite.

Once my nails were dry I applied a thin coat of Foil Glue. I got this glue with nail art foils from DollarNailArt.Com, you could just apply the flocking powder directly into your wet topcoat, but I found this held onto the fuzzies a little bit bettter.

Find some flocking powder, mine is Party Pink.

Best to do this part over a paper plate because it can get messy and that allows you to funnel the excess back into the container. Sprinkle some of the powder over your nail and lightly press it onto the nail so it sticks good. I then used a fan brush to brush off any excess.

Then you have this!

I wanted to test that water theory.....
When it gets in contact with water and/or soap it looks like this....

Did it ruin it? 
Once you lightly pat it dry to absorb the excess moisture, it looks just like it did before!
I wouldn't recommend much scrubbing, because that will likely loosen your powder. 
I wore this on an accent nail for a night out to test durability, and it faired better than I expected! I was out for 6 hours or so and I only had some flocking missing from the tips. The rest was still there, but it had thinned out a bit. So not bad! 

I know this look isn't from everyone, but it was a lot of fun for one night!
More aboutNovelty Nails - Fuzzy Sweater