Showing posts with label wear test. Show all posts

Dazzle Dry - Frozen Lemonade, Fast Track Cherry, & Grape Lollipop

Dazzle Dry was kind enough to send me some polishes to review, and I was intrigued by not only their color selection, but also their claims to dry fast & be chip free for up to 4 weeks.
Each polish can be purchased for $9 each, and the Trinity Kit can be purchased for $28.50.

They are fast-drying, nitrocellulose-free, "5-free," hypoallergenic. Made in the U.S.A, and sold in Asia, Australia, and most recently, the United Kingdom.
"Dries in 5 minutes or less, has a gel-like, rock-hard finish, and is even safe for pregnant and nursing moms! And, unlike many conventional nail polishes, also free of  nitrocellulose. That's why they guarantee their polish is NON-yellowing and completely safe on your nails."

First up is their "Trinity Kit" which has the Nail Prep (which nourishes, strengthens your nails and promotes adhesion), Base Coat & Top Coat.
Their base coat dries to a matte finish and the top coat is quite THICK. Thicker than the bottom dregs of a Seche Vite bottle. It does dry within 5 minutes like they claim, and has a very glossy gel like shine.
*The polish colors themselves are each very thick and gloopy. I worried they would never dry, but that wasn't the case. They just applied differently compared to other polish brands in my stash.

Frozen Lemonade - creamy yellow.
For each swatch I used the Trinity Kit to prep, base coat, 2 coats of polish, then top coat.
2 coats was all that was needed to get complete coverage. No streaks or uneven patches. Very impressive for a yellow!


Fast Track Cherry - standard red creme. Very glossy finish. Even coverage with just 2 coats.


Grape Lollipop - neon purple creme finish. This one was the only one that was a bit patchy and uneven. Pictured is 2 coats, but even after a third, it still seemed darker in some areas. :(
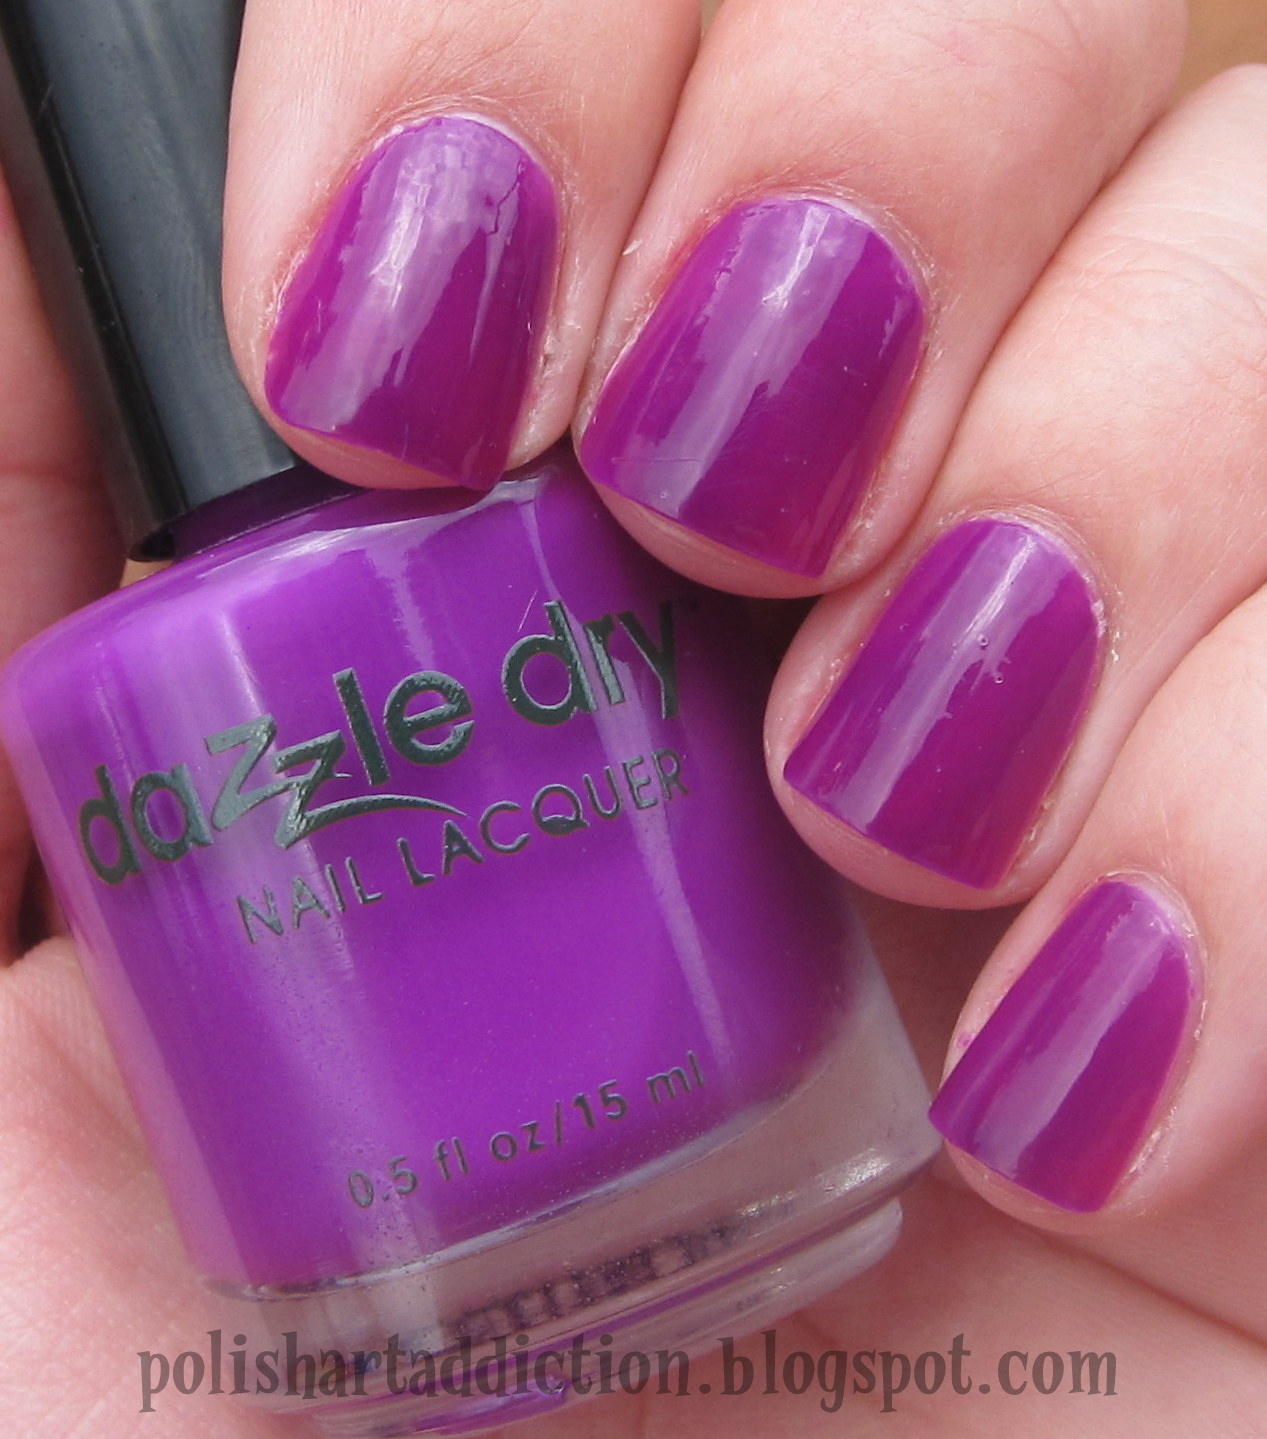


I wanted to do a wear test and my sister volunteered to be the guinea pig. She can wear one color of polish a lot longer than I can. Here she is after I applied Grape Lollipop to her nails and followed to exact instructions contained in the Trinity Kit packaging.

Within 13 hours she already had a few corners chipping. This picture was taken after 4 days (with her cell phone, so excuse the color inaccuracy and fuzziness) you can see it had some pretty funky chipping and wear after that amount of time. She doesn't do anything extreme with her hands either. She has a toddler and works as a nurse like me, so I felt she provided a pretty neutral wear test. I'm not sure how one could manage to get 4 weeks chip free with this polish, but I feel it wears about the same as any polish in my stash. Usually after a few days, I have chips show up no matter the brand.
*These products were provided for review*
More about → Dazzle Dry - Frozen Lemonade, Fast Track Cherry, & Grape Lollipop

Incoco Wear Test Results

5 full days of wear. That is quite epic for me. I'm used to changing my polish on a daily basis, so going the entire length of my vacation without a change was testing my limits. I'm confident that these Incoco strips could last a full 10 days on someone who is not as avid of a polisher...
 If you maximize these photos you can probably better tell the gap at my cuticles from new growth. On my thumb, the strip started to peel up from the cuticle edge, so the clear part is gone about halfway up.

From this angle you can notice the tipwear a little better, but I was pleased that there wasn't any lifting or chipping from the free edge.

At the end of 5 days I only had 2 chips. On my left ring finger nail here:

And on my right index nail here: (sorry it's a terrible iphone picture is why it's out of focus)

So this was exemplary in my opinion! I would definitely recommend Incoco and I will be repurchasing them in the future!
More about → Incoco Wear Test Results

Incoco Wear Test - Application

Hi guys! So I'm preparing to leave for my trip to Los Angeles! I'll be gone for about 5 days, but don't worry I have plenty of posts scheduled in the meantime. I thought a vacation would be a great opportunity to test run some Incoco Nail Polish Strips. I found these at a mall kiosk in Dallas TX. I took the opportunity to give the girl my blog business card ;) And she offered to sample a nail strip as an accent nail on top of my existing manicure. I then purchased a set to review for here! It cost $18 for the design I got. Now that I look at where they are on the website and cost only $9.99.... I feel robbed. Lol.

This design is called Gilded Couture, and it's part of the new fall collection called Cobra Couture.

It comes in 2 seperate packs. The french tip design strips and the clear strips.

 Each different sized strips looks like this with 2 french tips per size.

Maybe you can see the seam better here now that I've removed one.

You start with clean naked nails. The strips apply a lot like Sally Hansen Salon Effects Strips. Just peel off the backing and line it up where you want it. Smooth any wrinkles and file off the excess. My nails recently got trimmed to nubs after moving heavy luggage for my Dallas trip... So I placed the strips a little lower than my natural smile line.

It's a really nice fall appropriate design. And neutral enough to go with several of my L.A. outfits.

This is how many strips I had left after finishing both hands. Side note - I have large nail beds and normally my thumbs are too wide for standard strip sizing, and I usually can't wear the smallest size because it's only half the size of my pinky. These Incoco strips worked great for me though, biggest size was perfect for my thumbs and no wasted tiny baby strips. :) These extras can be sealed in an airtight bag and kept for later use if you like.

Then the clear strip layer.

 You get 16 total clear strips

My first thought was that they would be slightly pink toned to enhance the french aspect, but no they are perfectly clear. Almost like putting saran wrap on your nails.

It adds a nice shiny glow, just like topcoat. These strips are made so that you don't have to apply any base coat or topcoat. They are made of nail polish so they remove with acetone.


Sizing on the clear strips was perfect for me as well. Just 6 strips left over at the end.

In comparison to the Sally Hansen Strips, I found Incoco to be much thinner and slightly easier to apply. The SH strips being thicker makes it easier to pull it back up and reposition if necessary, Incoco I'm afraid would probably tear.

So I plan on wearing these for a while and giving them a wear test. I'll be sure to post an updated final verdict.
More about → Incoco Wear Test - Application

Jamberry Nail Shields Product Review

The lovely respresentatives of Jamberry Nails contacted me about reviewing their product. I have to mention that it was such a pleasant exchange of information! Their product is made in the US and they only have US reps, so that means they spoke/wrote proper English that didn't require decifering. (Unlike some other nail art companies that are based out of other countries that send broken English e-mails that just confuse me...)

What is their product?
It is a vinyl-based film covering that is both heat and pressure activated. They are NOT stickers or decals. Nor are they made of nail polish like the Sally Hansen Salon Effects Strips. They have so many different designs to choose from on their website! Many patterns would be easy enough to recreate by using Konad stamps, but others are much more intricate.
I picked out the Blue Damask pattern.


They come as a sheet of 18 individual strips. The range of sizes available really impressed me! I have large nail beds and often times have trouble finding the right sizes. This was great! The left side is large enough for your big toe! Down to the far right is for a narrow pinky nail, or perhaps a little toenail. :) Each strip was long enough for me to get 2 uses out of it if I cut it in half lengthwise.

How do you apply them?
  1. Use acetone to remove any oils from your nails, lightly buff them if they are really slick...
  2. Once you select what size will fit you best (I found it easiest to cut the strips in half while still applied to the backing sheet), peel it off of the backing with tweezers. This is important because you don't want the oils on your fingers to have contact with the adhesive. (It won't stick to your nail as well.)
  3. Once you are holding just the strip with tweezers, hold it under the warm heat of a blow dryer for 15-20 seconds. The heat activates the adhesive and you can see it start to look more "wet" and the strip almost starts to curl as it gets more flexible.
  4. Then you align it to the cuticle and smooth it onto your nail bed.
  5. Once you get to the free edge, just cut away the excess and lightly file in a downwards motion to match the edge of your nail.
  6. Then press the strip down firmly all over, to ensure good contact.
  7. You can hold your nail under the blow dryer for a few more seconds to heat it again, and apply more pressure.
Here is a link to their YouTube instructional video if my directions were confusing.
I didn't have much trouble with these at all! They were pretty easy to apply. The only complication I had was some wrinkles along the free edge. I couldn't get the sticker to lie flat where my nail started to curve downwards.

 But that's it! They are dry immediately and you don't have to wait for fear of them messing up. You do not apply a topcoat because they are already shiny.


18 nail shields is more than enough for one manicure! In fact, I applied these as an entire manicure and an entire pedicure..... and I ended up with 7 whole strips left! For short toenails I was able to get 3-4 uses out of each strip. Because of this I feel like the price ($15 per pack) is very reasonable.
How long do they last?
They are said to last up to 2 weeks like other similar products boast. My nails only lasted until the next night before I got bored and started to pick them off from where they wrinkled. I mentioned that I also put them on my toes and they are still there! I applied them on 2/12 and it's now 2/18 as I type this and they still look good as new! I don't have any lifting or tipwear on my toes. I will update this post on the day I end up taking them off to let you know.

Are they difficult to remove?
Not at all! You just find a loose corner and peel it off. It comes off easily and in one whole sheet. It doesn't chip or tear. It also doesn't leave any residue on the nail bed. There is no adhesive left behind, and it does not appear to damage the nail bed. You can hold your nails under the blow dryer again to loosen them if needed.

My end opinion? I think they're pretty cool. For this type of product that boasts a long wear time, this is the only one other than Sally Hansen Salon Effects that I've found to live up to the claim. (But again, they are made differently. One is nail polish, one is vinyl.) So go check out the many designs on their website and buy some to try out yourself. :) They have a special offer of buy 3 get 1 free. You can get yours HERE and at checkout make sure to choose Leslie under "party." ;)
More about → Jamberry Nail Shields Product Review