Showing posts with label kiss nail art. Show all posts

Teal and Coral Leopard French

These were directly inspired by Beautopia Nails. She did a beautiful set of teal french tips with a bright coral/orange OPI leopard spots. I used China Glaze For Audrey, China Glaze Flip Flop Fantasy, and Kiss Nail Art Striper in black.


These are so bright and fun! I just love the combo of teal and coral too. :)
More about → Teal and Coral Leopard French

French Wolverine

Another superhero inspired french tip. I like that this one is vague enough that not everyone would get it right away. ;)


Tutorial, anyone?
 
Freehand some blue french tips, here I used Sinful Colors Rainstorm.

Then add a yellow stripe to the bottom. I used yellow acrylic paint and a skinny striper brush.

Then add 3 parallel lines coming from the corner. Make sure the middle line is slightly longer than the other 2. I used Kiss Nail Art Striper in silver glitter. Add a thick layer of topcoat!

More about → French Wolverine

French Batman

My Disney Princess French Tip nail art series has proved to be quite popular, especially on Pinterest. (Ariel, Aurora, Jasmine, Cinderella, Snow White, Pocahontas)
 
After my most recent Superheroes nail art I was inspired to try the same thing, but with comic book characters. So first up is a Batman inspired french nail art design.


Tutorial anyone?
 
1. (Should probably apply a base coat and let it dry, which I didn't do here.)
Tape off your tips and paint them with yellow polish. I used Barielle Lemondrops.
 
2. Freehand a small black line along the bottom of the french. I used Kiss Nail Art Striper in black.

 
3. You could be daring a freehand the Batman symbol on an accent nail, but I chose to take the easy route and stamp the bats from the BM13 plate. (I double stamped one of the guys)
 
4. My guys didn't transfer terribly well... probably because it was on my naked nail, so I took my same striper polish in black and darkened them up a bit.
 
5. Allow enough time for your black polish to dry before applying a thick coat of Seche Vite. (Otherwise you'll potentially drag in some places like mine did)
 
What do you think?
More about → French Batman

Doctor Who Tardis Tutorial

The Tardis design from this nail set is actually pretty simple. So here is a how-to.


Start with a base coat to protect your natural nail.
Paint a solid silver polish, I used Sally Hansen Celeb City.
Top it with 2 coats of a silver glitter, or holographic polish. I used Shimmer Polish Alice.

 
Use a nail art striper brush to create the 2 lines shown on the left.
Then fill in the space between those lines.
I used Sinful Colors Rainstorm.

 
Add the extended pieces to the roof line.
Outline the entire Tardis with a black striper polish.
I used Kiss Nail Art Striper in black.

 
Add 3 lines down the middle, like pictured.
Then add the other lines to make the outer ones rectangles.

 
Draw a line halfway down the center of the rectangles, and then 3 lines crossways.
Use a white striper polish to fill in the topmost section.
I used Kiss Nail Art Striper in white.

 
Outline the white section with your black striper to neaten up the edges. Then do the crosshatching in the window section.
Then add the lettering. I find letter really hard to do using a striping polish, so I used acrylic paint and a skinny brush to achieve legible words. (Acrylic paint is easier because it is a thinner consistency.)
 
Then apply topcoat once everything is dry. I used Seche Vite.
 
I hope this helps you!
More about → Doctor Who Tardis Tutorial

Chevron Nail Art Day 2

I changed up the design a bit for the second day of wear. My white nails had started to chip. (previous look) I changed my Au Champagne nails to be China Glaze Pink Voltage. This is more like the inspiration look. Enjoy!


More about → Chevron Nail Art Day 2

Chevron Nail Art

These were once again something I saw on Pinterest and had to recreate. It was this design, but I wanted it to be monochromatic... so I left out the pink and went with sparkly white. In the original post, she mentioned that she had them done with gel at a nail salon. Mine just use regular polish.

I used Orly Au Champagne, Kiss Nail Art Striper in black, the glittery nail is Sally Hansen Xtreme Wear Celeb City topped with OPI Crown Me Already!


After 2 days, my chevron still looked good, but the rest were chipping.... so I did paint them pink and changed the sparkly nail to solid black. I'll post pictures of that once I get them edited properly.
More about → Chevron Nail Art

Fall Dots

This is another as seen on Pinterest type design... This is the original link. I adapted it to work for nails though.

It makes me think of tribal, or maybe Native American......


 These are the polishes I used.
For tools I just used a medium striper brush and 2 different sized dotting tools.
 Kiss Nail Art Striper in black, Sinful Colors Snow Me White, Essie Very Structured, China Glaze Life Preserver, Orly Decades of Dysfunction, & Orly Ancient Jade.
The base polish is not pictured, but it was Color Club Incognito.

More about → Fall Dots

Pineapple Nails

I copied these from this design from A Girl and Her Polish I found through Pinterest. I thought they were adorable! I know some areas are transitioning into the fall season already, but it's still very hot here in Louisiana. Summery nail art still applies! :)


Cute, right?! Here is how I did it:

Started with 2 coats of Sally Hansen Insta Dri Lightening

1 coat of Sation Sunset Silk.
This polish is mostly sheer on it's own, so 1 coat over bright yellow just added a bit of orange shimmer.

Then I stamped BM-310 with Barielle Coco Bar. I didn't care that it wasn't perfect. I missed some near the cuticle, but that's where the leaves are going to go...

Base of the leaves with Kiss Nail Art Striper in white.

Freehanded some Sinful Colors Exotic Green over the white leaves. (This green is also sheer and I didn't want it to take on a yellow tone, hence the white base)

Some darker shadows added to the leaves with OPI Jade is The New Black.

Then I added some highlights to the leaves with China Glaze Refresh Mint.
(I wish I had stopped before this step lol. I think the green is too light.)

What do you think?


More about → Pineapple Nails

Sweet Little Piggies

I found this pedicure design through Pinterest and knew immediately that I wanted to recreate it. I think they are adorable and oh so sweet and girly. :)

I used Sally Hansen Lavender Cloud, China Glaze Second-hand Silk, and Kiss Nail Art Striper in Black. The stripes and hearts were all freehanded although the perfectionist in my kind of wishes I had used tape.
More about → Sweet Little Piggies

Studs on my toes!

I applied China Glaze Flirty Tankini to my toes and then added some texture with studs. These actually came from a pack of Kiss Nail Art sticker embellishments.  They are raised individual studs with a sticky back. I also applied topcoat over everything to seal them in a bit better.
(These square studs are the same size as the 4mm ones from Born Pretty)

More about → Studs on my toes!

Amandlandish Guest Post

I recently did a guest post for my friend Amanda! You can check it out here.
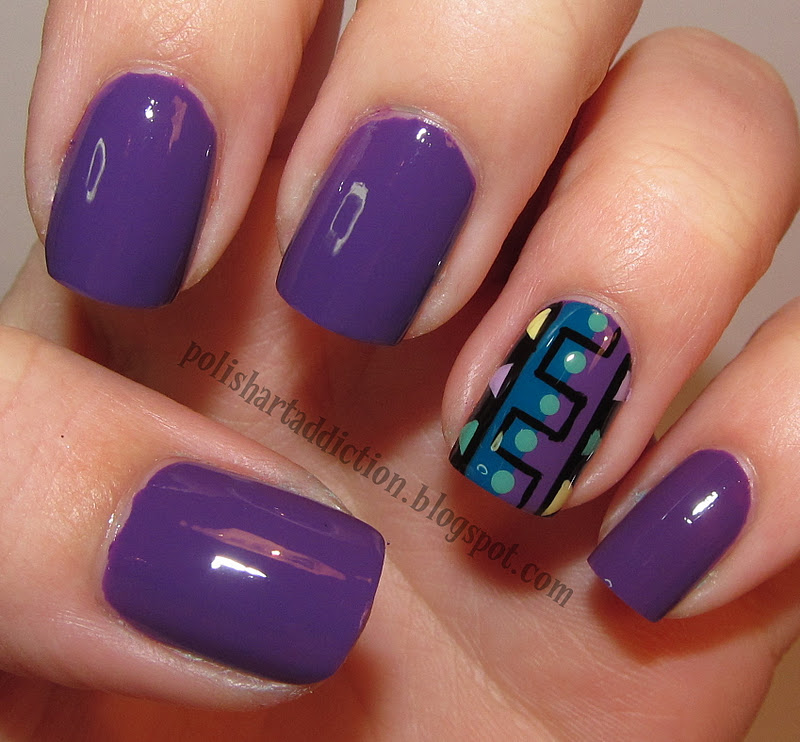
"Hi Amandalandish inhabitants! I'd like to share with you a tutorial for an accent nail that looks more complicated than it really is. If you really wanted to blow people's minds you could do each nail with this pattern! I'll break it down so you can see each step. The only secret is to use polishes that are opaque in one coat, and fairly fast drying."
 I started with Barielle Grape Escape. I used 2 coats.
 Pick an accent nail. Make sure it's dry.
 Then I used a black striper polish to do a line down each side and fill out to the edge.

Then I used 1 coat of Barielle A Bouquet for Ava to divide the middle purple section in half. Use a small paintbrush, or if the previous steps are completely dry you can mask off the area with scotch tape.

Then I used the same black striper polish to do the following lines across the middle section.

Same thing for these lines.

Then I used a medium sized dotting tool to add these dots of Barielle Sweet Addiction. Just go down the middle dividing line between the teal and purple sections.

Then I made triangles along the black sections. This wasn't that hard. I just used my smallest dotting tool and basically did 3 dots close together. They don't have to be perfect triangles just yet.
 These light teal dots are made using Barielle Sweet Addiction.

 Repeat the same 3 dots close together to make some light purple triangles. I used Barielle Expressive.

Same thing for yellow triangles. I used China Glaze Lemon Fizz.

At this point my triangles did not have sharp corners, so I took my black striper polish to straighten the sides of each triangle. That perfected them.

Wait until your nail art is dry (give it 10 minutes to be safe) and apply a layer of topcoat. This will help to smooth it out and last longer! If you apply the topcoat too soon, you risk smudging the art. That would not be good after all the time it took.
 Here are all of the polishes I used: Barielle Grape Escape, A Bouquet for Ava, Expressive, Sweet Addiction, China Glaze Lemon Fizz, & Kiss Nail Art striper in black.

So there you have it! It's a lot of little steps, but once you break it down.... each step is not too difficult. With patience you can recreate it! The benefit of using fast drying/one coater nail polishes, is that the layers will not be too thick and difficult. If each step were done with a thick gloopy coat of nail polish, it would NEVER dry! So the secret is to be thin. 
"Thanks for inviting me Amanda! And thank you to all of you followers that read this! Come and see me sometime. ;)"
More about → Amandlandish Guest Post